
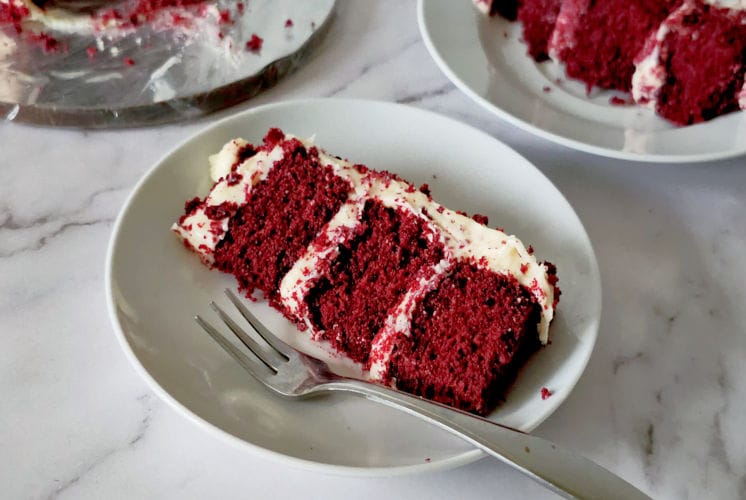
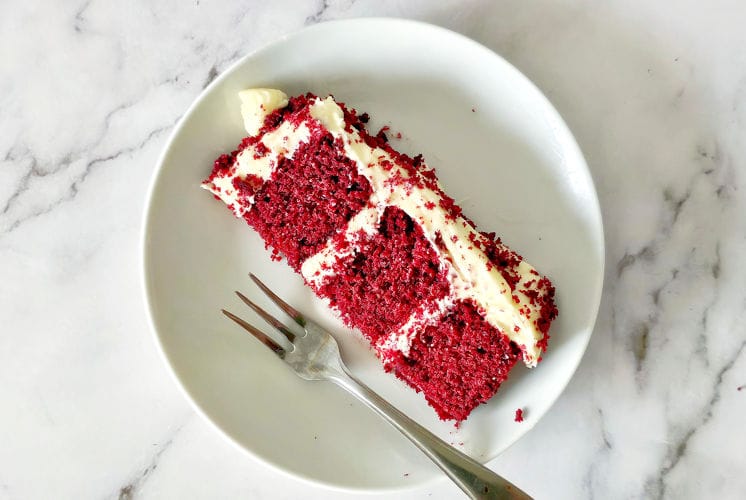
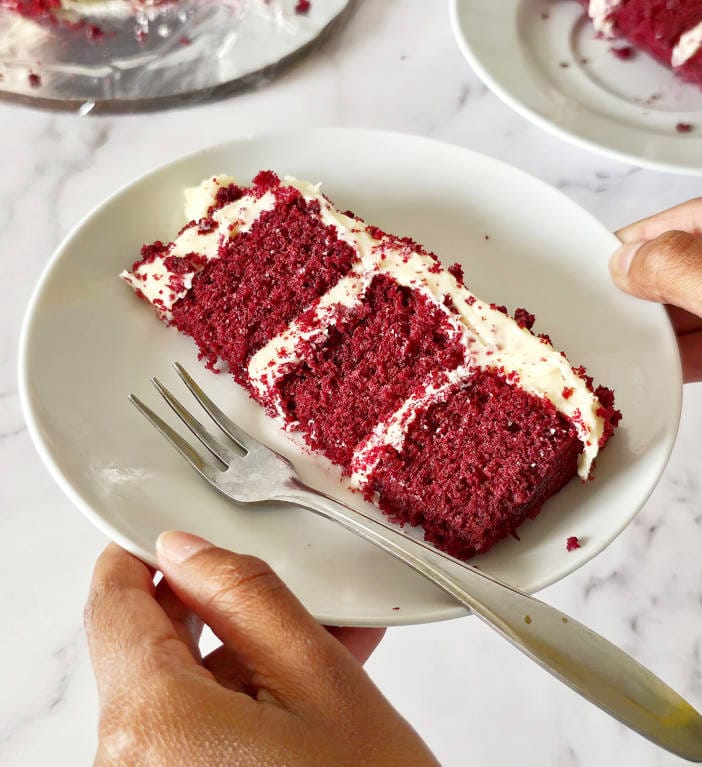
Try this red velvet cake with coffee that’s both rich and indulgent, yet with a little twist.
Red velvet cake has always been a classic favorite, with its smooth texture and beautiful color, but what if we add some coffee to it?
Yes, you heard that right—this red velvet cake with coffee flavor that takes every bite to a whole new level.I can’t wait for you to try this recipe!
The coffee adds a warm depth that perfectly brings out the chocolatey flavor of the cake. It’s not overpowering, just enough to make you wonder, “How did I not think of this sooner?”
Whether you’re baking for a special occasion or just because, this red velvet cake with coffee is sure to impress.
Why you will love this red velvet cake with coffee?
Why is this red velvet cake so irresistible? Trust me, once you take a bite, you’ll understand why it’s one of the most beloved cakes on my website.
- Super soft, moist and flavorful.
- No need of sugar syrup while assembling the cake.
- Perfect balance of vanilla and chocolate.
- Extremely easy to make.
- Uses basic pantry ingredients.
- Perfect for any occasion ( usually make it for Valentines every year).
- Excellent cloud pleasure recipe.
- Will surely impress your friends and family.
How to make a red velvet cake with coffee?
Before diving into a detailed step-by-step recipe, let’s understand the overall steps to make this mouthwatering red velvet cake.
| Sr. No. | Steps |
| 1. | Sift dry ingredients. |
| 2. | Beat butter and sugar. |
| 3. | Add wet ingredients. |
| 4. | Combine wet and dry and make cake batter. |
| 5. | Bake. |
| 6. | Make cream cheese frosting. |
| 7. | Fill, frost, decorate. |
| 8. | Serve. |
Red velvet cake with coffee ingredients
Red velvet cake ingredients
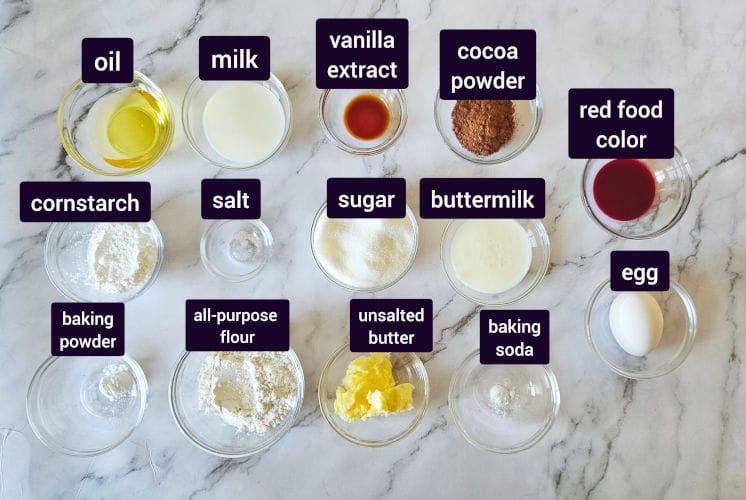
Before you get started, let’s look at the ingredients you’ll need and why each one plays such an important role in making your cake absolutely perfect.
Please note, I forgot to add coffee in the pic above. Please refer to the recipe card for exact measurements.
1. All-Purpose Flour – First up, we’ve got the flour. This is the foundation of your cake, and it’s responsible for giving it structure. You’ll want to use regular all-purpose flour—no need to go fancy here. The flour helps to balance out all the wet ingredients and creates that perfect, tender crumb. If you use too much, though, your cake will be dry, so make sure to measure carefully!
2. Granulated sugar – Ah, sugar—the sweet stuff that makes everything better! Sugar not only adds sweetness to the cake, but it also helps with the cake’s texture. It locks in moisture, keeping the cake soft and tender. And did you know it also helps with the color? The sugar caramelizes slightly during baking, which adds to that beautiful red hue. So, don’t skip the sugar—it’s key for both flavor and texture.
3. Cocoa powder – Here’s the secret to the subtle chocolate flavor in red velvet cake: cocoa powder! You don’t need a ton of cocoa powder, just enough to add that rich, earthy flavor without overpowering the cake. It also helps deepen the color, making the red velvet shade pop. Be sure to use unsweetened cocoa powder—this gives you the right balance of flavor without making the cake too sweet or bitter.
4. Coffee – Use your favorite instant coffee, no specific mention here. Coffee brings out the chocolate flavor without even knowing it is added to the recipe. Don’t worry, you will not taste coffee at all.
4. Baking soda – Now, let’s talk leavening. Baking soda is your best friend in red velvet cake! It reacts with the acid (like vinegar) in the recipe, causing the cake to rise and become light and fluffy. Don’t try to substitute it for baking powder, though. Baking soda is specifically needed to get the right texture, so be sure to add it!
5. Buttermilk – Here’s the ingredient that adds that signature tang to your red velvet cake: buttermilk. Not only does it give the cake a subtle tart flavor, but it also helps keep it moist and tender. Buttermilk reacts with the baking soda to create that perfect, airy texture. If you don’t have buttermilk, don’t worry—just mix a tablespoon of vinegar or lemon juice into a cup of milk and let it sit for a few minutes to make a quick substitute.
6. Vegetable Oil – You might be surprised to see oil in a cake recipe, but oil is a crucial part of a red velvet cake! Unlike butter, oil keeps the cake incredibly moist and gives it that tender, melt-in-your-mouth texture. Plus, the neutral flavor of vegetable oil doesn’t compete with the other ingredients, so it lets the buttermilk, cocoa, and vanilla shine through.
7. Eggs – eggs do a little bit of everything in a cake—they help bind the ingredients together, provide structure, and give the cake its richness. In red velvet cake, eggs are essential to creating that smooth, cohesive batter and helping the cake rise. Don’t skip them!
8. Vinegar – You might be wondering, “Vinegar in cake?!” Yep! Just a little bit of vinegar is key in red velvet cake. It reacts with the baking soda to create bubbles, helping the cake rise and become fluffy. Plus, the acidity of the vinegar enhances the tangy flavor that red velvet is known for. You don’t need much, just a tablespoon or two does the trick.
9. Vanilla extract – Vanilla is the unsung hero in many cakes, and red velvet is no exception. A little vanilla extract adds a layer of flavor that complements the other ingredients without stealing the spotlight. It adds that subtle warmth and makes the cake taste even more delicious, so don’t leave it out!
10. Red food coloring – Now, let’s talk about what makes red velvet red! Red food coloring is essential for giving the cake that iconic, vibrant hue. Don’t go overboard, though—a couple teaspoons are all you need.
Cream cheese ingredients
1. Cream cheese – Use regular full fat cream cheese. Philadelphia or Lactantia are my favorite brand in cream cheese. If you are in India, you can also get ‘Britannia’ and ‘Dlecta’ brand cream cheese. PS: I am not getting paid to mention the names here but just mentioning my favorite brands.
2. Unsalted Butter – This will give richness and structure to our frosting. Cream cheese is very soft so you will need something to hold the frosting together. If you are using salted butter then skip out the salt.
3. Icing sugar – Use only Icing sugar, confectioners sugar, or powdered sugar. DO NOT use regular white granulated sugar. This recipe does not require any cooking or baking so there is no way the regular sugar will melt and mix up with other ingredients. So, use icing sugar which will be easily dissolved in the cream cheese and butter.
Don’t have icing sugar? I got you! Finding in a middle of recipe that one ingredient is not there is such a disappointment. But, don’t worry. You can make icing sugar at home in no time. You can check my homemade powdered sugar recipe which gives all the details along with all the tips and tricks.
4. Vanilla extract – You can use pure vanilla extract or artificial extract, whatever is available in your pantry.
5. Salt – Just a pinch! Trust me, this will enhance the flavor of cream cheese frosting. If you are using salted butter then skip this ingredient.
Tools used
- Measuring spoons / measuring cups – to measure the ingredients.
- Weighing scale – to precisely measure ingredients.
- Rubber spatula – to scrape the bowl.
- Mixing bowls – to mix cake batter for red velvet cake.
- Hand beater – to beat butter sugar and prepare cake batter.
- Three 4-inch cake pans – To bake the cake layers.
- Parchment paper (optional) – to cover the cake tins.
- Plastic wrap – To cover the cake layers.
- Rotating table – to fill and frost the cake.
- Piping bag and piping tip – to fill the frosting and to decorate the cake.
Red velvet cake with coffee step-by-step recipe
Red velvet cake step-by-step recipe
Preheat and prep – First things first, preheat your oven to 350°F (185°C). Grease three 4-inch round cake pans and line them with parchment paper if you want an extra easy release after baking. This will save you some stress later!
Sift dry ingredients – In a medium-sized bowl, sift together the flour, baking powder, cocoa powder, coffee and salt. Sifting helps make sure we have lumps-free cocoa powder and the ingredients are evenly distributed giving the cake that fluffy texture we love.
Cream butter and sugar – In a large bowl, add softened, room temperature unsalted butter and sugar. Beat it together until it is light and fluffy.
Add wet ingredients – Now, add wet ingredients, vanilla extract, egg, and red food color to the butter-sugar mixture. Beat until it is just combined.
Alternate dry with milk – Now alternate half of the dry mixture with butter and beat until it is just mixed. Repeat until everything is finished.
Add last 2 ingredients – Finally, add baking soda and buttermilk and beat until mixed. Why are we adding it in the list? Because these will combine and helps the cake to rise and we don’t want to start this process early while mixing cake batter.
Divide – Divide the cake batter equally (117 gms) in three 4 inch tins.
Bake – Bake in preheated oven at 350F or 180 C for 12 minutes.
Cool – Once they are baked, transfer them to a wire rack and let the layers cool down completely.
Cover and refrigerate – Once cake layers are cooled down to room temperature, cover each layer with plastic wrap and refrigerate for at least 2 hours. If you are in a hurry, freeze the layers for 30 minutes.
Cream cheese step-by-step recipe
In a separate mixing bowl, combine room-temperature unsalted butter and beat for a few minutes with a hand or stand mixer.
Next, add softened cream cheese and mix the butter and cream cheese together until light and frothy.
Now, add vanilla extract and salt. PS: I didn’t use salt because I used salted butter in this recipe.
Sift in 1/2 cup powdered sugar at a time, beating until mixed.
Repeat until all the powdered sugar is gone.
Scrape down the bowl and beat again for 3 to 5 minutes.
Add the cream cheese to the piping bag.
Assemble
Arrange cake layers – Add a huge drop of frosting on the cake board. And, then place one 4-inch mini cake on the cake board.
Spread frosting – Spread a generous amount of frosting on top. Smooth the frosting using an offset spatula.
Repeat – Repeat the last two steps for all three layers.
Crumb coat – After adding the frosting between the layers, crumb coat the cake with frosting and refrigerate for 10 to 15 minutes.
Frost – Remove the cake from the refrigerator and frost the sides with the remaining cream cheese frosting.
Serve
Garnish – Garnish with crumbs of red velvet cake.
Pipe – Pipe on top of the cake using your favorite piping tip.
Serve – Serve it right away and enjoy.
Watch me making (video)
Storing and freezing instructions for red velvet cake with coffee
So, you’ve made the most amazing red velvet cake and you want to make sure it stays fresh for as long as possible. Whether you have leftovers or you’re making it ahead of time for a special occasion, I’ve got all the tips you need to keep your cake looking and tasting just as delicious as when you first baked it.
Storing red velvet cake (for a few days)
If you plan on enjoying your red velvet cake within the next 3 to 4 days, here’s what you do:
Keep it in an airtight container – This is key! You want to make sure your cake stays moist, so store it in an airtight container or cover it tightly with plastic wrap. If you have multiple layers, try separating them with parchment paper to prevent the frosting from sticking to the top of the cake.
Room temperature is fine (for the most part) – If you’ve made your cake with cream cheese frosting, I recommend storing it in the fridge. But if it’s just the cake (without frosting), you can keep it at room temperature for up to 2 days. The cool temperature of the fridge will keep the frosting fresh, but don’t let it sit out too long or it might get too firm.
Refrigerate if frosted –
Cream cheese frosting can get a little soft and gooey at room temperature, so if your cake is already frosted, pop it in the fridge. Just be sure to let it sit out for 15-20 minutes before serving to let the frosting soften a bit.
Freezing red velvet cake (for longer storage)
Want to make your cake ahead of time or freeze leftovers? Freezing red velvet cake is totally doable, and it actually keeps pretty well! Here’s how to do it without compromising on taste or texture:
Freeze the cake layers first –
If you have a multi-layered cake, it’s best to freeze the layers individually first. Just wrap each layer tightly in plastic wrap, making sure there are no exposed parts. Then, wrap them again in aluminum foil or place them in a freezer-safe bag. This double-wrap will protect the cake from freezer burn.
Freeze without frosting –
If possible, I recommend freezing the cake layers without the frosting. Frosting can change in texture when frozen and thawed, especially with cream cheese. So, freeze the cake layers and then frost them once they’re thawed and ready to go.
If it’s already frosted –
If your cake is already frosted and you want to freeze it, just be sure to freeze it in a way that keeps the frosting intact. Place the whole frosted cake (on a baking sheet) in the freezer for about 1-2 hours to let the frosting firm up. Once firm, wrap the entire cake in plastic wrap and aluminum foil. It’s a good idea to cut the cake into smaller portions first, so you can defrost only what you need.
Label and date it –
Always label your cake with the date you’re freezing it. That way, you’ll know how long it’s been in the freezer. I suggest eating it within 2-3 months for the best flavor and texture.
Thawing red velvet cake
When you’re ready to enjoy that frozen red velvet goodness, here’s how to thaw it out perfectly:
Thaw the cake layers –
Take the cake layers out of the freezer and unwrap them. Let them sit at room temperature for about 2-3 hours (depending on the size of the layers). They’ll thaw beautifully and will still be just as soft and moist.
Thawing a frosted cake –
If your cake is frosted, remove it from the freezer and place it in the fridge overnight to defrost slowly. This helps preserve the texture of both the cake and the frosting. After it’s thawed in the fridge, let it sit out at room temperature for 20-30 minutes to soften the frosting before slicing into it.
Variations
There are so many fun ways to play around with this Red Velvet Cake with Coffee recipe, so feel free to get creative!
- Add more coffee – If you want a stronger coffee flavor, you can increase the amount of espresso powder or even swap the milk for brewed coffee.
- Use chocolate chips – Add some white chocolate chips in between the layers while filling the cake with cream cheese frosting.
- Drizzle caramel – Drizzle some salted caramel in between the layers while filling the cake.
- Chocolate ganache – Although red velvet cake pairs nicely with cream cheese frosting, chocolate ganache would take your cake to the next level. Try with either dark chocolate ganache or white chocolate ganache.
- Ermine frosting – As mentioned above, cream cheese and red velvet is a match made in heaven but try pairing it up with ermine frosting or flour frosting and you will be amazed at the results.
Which one would you prefer from the list mentioned above or would you like to go with traditional cream cheese frosting? Please let me know in the comments below.
Secret tips to make the best red velvet cake
Imagine perfectly soft, moist red velvet cake cake with that gorgeous red color, topped with rich cream cheese frosting… I mean, is there anything better?
Here are some of my tips to help you create the BEST red velvet cake ever!
- Measure ingredients – Do not just eyeball the ingredients. I would highly recommend measuring it with weighing scale so that your cake turn out the best every single time.
- Use quality ingredients- Always use quality ingredients, especially the cocoa powder. Use dutch processed cocoa powder for that intense chocolate flavor and the second most important ingredient is the vanilla extract. Use pure vanilla extract for rich vanilla flavor.
- Don’t overmix the cake batter – When you’re mixing your batter, don’t overmix. Overmixing can result in a dense, tough cake, and nobody wants that. Once the wet and dry ingredients are combined, mix just until everything is incorporated. You’ll have a light and airy cake if you don’t overdo it!
- Don’t overbake – Keep a close eye on your cake as it bakes. Overbaking can lead to a dry, crumbly cake. You want your red velvet cake to be moist and tender. Bake it at 350°F (175°C) for about 30 minutes, or until a toothpick inserted into the center comes out clean with just a few moist crumbs. Every oven is different, so don’t be afraid to check on it early!
- Cool the cake completely before frosting – I know the temptation to frost a warm cake is strong, but trust me, you’ll regret it! If you frost your cake while it’s still warm, the frosting can melt and slide off. Let the cake cool down completely on a wire rack. This will ensure that your frosting stays put and looks perfect. The best is to freeze for an hour or two!
- Serve room temperature cake – Any frosted cake tastes the best when served at room temperature. So, take your cake out at least 30 minutes before serving.
FAQ’S
Want to try some other cake recipes?
- Mini vanilla cake (4 inch vanilla cake recipe).
- Easy orange loaf cake.
- Air fryer chocolate lava cake.
- Moist lemon pound cake recipe.
When are you making?
I’d love to hear when you are making this delicious red velvet cake with coffee! Whenever you make this, let me know how it turns out for you. Do you have any fun twists or personal variations you like to add? Drop a comment below—I’m always excited to hear your thoughts and creative ideas! Let’s chat about all things cake and coffee. 😊
Maybe you like to add a touch more espresso for a stronger coffee flavor, or perhaps you’ve experimented with different frosting flavors? Whether you’ve made this cake as a special treat or for a big celebration, I’m curious to know what worked (or didn’t!) for you. There’s always room to explore and improve on a recipe, and who knows, your suggestion might just be the next big thing!
Feel free to share your experiences, tips, or any questions you might have. This is a space where we can all learn from each other and get inspired to bake something delicious! I can’t wait to hear from you!
Recipe card
4 Inch Red Velvet Cake With Coffee
Description
This Red Velvet Cake with Coffee is the ideal blend of two favorite flavors: rich, velvety cake and a slight hint of coffee. The moist, fragile layers are perfectly balanced by a light, creamy frosting, making this the ideal dessert for any occasion.
Ingredients
Red Velvet Cake Ingredients
Cream Cheese Frosting Ingredients
Instructions
Red velvet cake step-by-step recipe
- Preheat and prep - First things first, preheat your oven to 350°F (185°C). Grease three 4-inch round cake pans and line them with parchment paper if you want an extra easy release after baking. This will save you some stress later!
- Sift dry ingredients - In a medium-sized bowl, sift together the flour, baking powder, cocoa powder, coffee and salt. Sifting helps make sure we have lumps-free cocoa powder and the ingredients are evenly distributed giving the cake that fluffy texture we love.
- Cream butter and sugar - In a large bowl, add softened, room temperature unsalted butter and sugar. Beat it together until it is light and fluffy.
- Add wet ingredients - Now, add wet ingredients, vanilla extract, egg, and red food color to the butter-sugar mixture. Beat until it is just combined.
- Alternate dry with milk - Now alternate half of the dry mixture with butter and beat until it is just mixed. Repeat until everything is finished.
- Add last 2 ingredients - Finally, add baking soda and buttermilk and beat until mixed. Why are we adding it in the list? Because these will combine and helps the cake to rise and we don't want to start this process early while mixing cake batter.
- Divide - Divide the cake batter equally (117 gms) in three 4 inch tins.
- Bake - Bake in preheated oven at 350F or 180 C for 12 minutes.
- Cool - Once they are baked, transfer them to a wire rack and let the layers cool down completely.
- Cover and refrigerate - Once cake layers are cooled down to room temperature, cover each layer with plastic wrap and refrigerate for at least 2 hours. If you are in a hurry, freeze the layers for 30 minutes
Cream Cheese Frosting Step-By-Step Recipe
- In a separate mixing bowl, combine room-temperature unsalted butter and beat for a few minutes with a hand or stand mixer.
- Next, add softened cream cheese and mix the butter and cream cheese together until light and frothy.
- Now, add vanilla extract and salt. PS: I didn't use salt because I used salted butter in this recipe.
- Sift in 1/2 cup powdered sugar at a time, beating until mixed.
- Repeat until all the powdered sugar is gone.
- Scrape down the bowl and beat again for 3 to 5 minutes.
- Add the cream cheese to the piping bag.
Assemble
- Arrange cake layers - Add a huge drop of frosting on the cake board. And, then place one 4-inch mini cake on the cake board.
- Spread frosting – Spread a generous amount of frosting on top. Smooth the frosting using an offset spatula.
- Repeat – Repeat the last two steps for all three layers.
- Crumb coat – After adding the frosting between the layers, crumb coat the cake with frosting and refrigerate for 10 to 15 minutes.
- Frost – Remove the cake from the refrigerator and frost the sides with the remaining cream cheese frosting.
Serve
- Garnish - Garnish with crumbs of red velvet cake.
- Pipe – Pipe on top of the cake using your favorite piping tip.
- Serve - Serve it right away and enjoy.
