
The reason behind making this Starbucks red velvet loaf cake recipe is, it’s seasonal. It’s their winter baby. I was craving for it and it was spring so obviously it wasn’t there on the Starbucks Menu. So, I decided to make it and since then, I have not bought it from Starbucks. You know why, because homemade and from scratch will taste better, always.
Most importantly, due to the ongoing trade war between the United States and Canada, prices for everything could skyrocket suddenly. This includes our favorite Starbucks treats. Making handmade snacks will provide an added benefit. Would you agree?
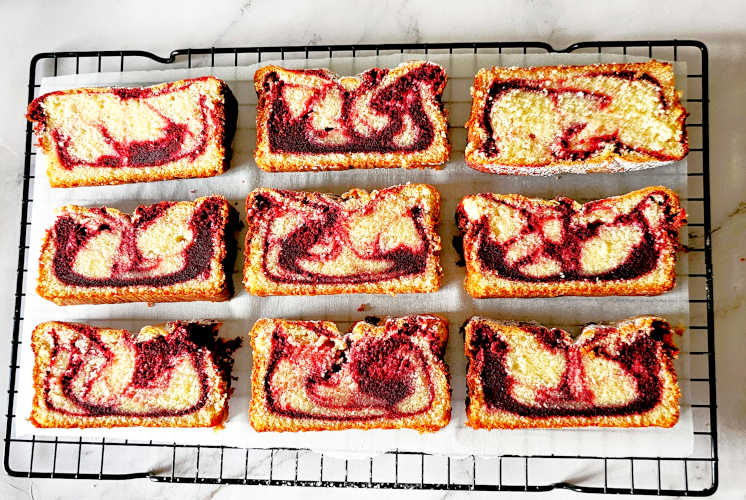
This recipe is a moist vanilla loaf cake with a red velvet swirl and then topped with cream cheese glaze. You don’t have to make two separate cake batters, make just one vanilla cake batter, and then make red velvet. Finally, alternate the batter in a loaf pan and make swirls. Don’t worry, I have explained it in a step-by-step recipe.
Cream cheese glaze is nothing but cream cheese frosting in a liquid state. Try it as a mini treat, with a cup of your favorite coffee or team, or your midnight cravings.
Try my homemade red velvet cake recipe next. I am also a fan of other Starbucks treats, such as Starbucks chocolate cake pops, and Starbucks dairy-free hot chocolate. Before they make it seasonal, I recreated them at home 🙂
What is so special about this Starbucks red velvet loaf recipe
Let me tell you what is special about this recipe. I guarantee you that you will never buy a slice from Starbucks once you try this cake.
- Soft, moist, tender, and colorful.
- Very easy recipe just like my marble loaf cake recipe.
- No need to make a trip to Starbucks and also less expensive than Starbucks.
- One cake batter, divided into vanilla and red velvet.
- Tastes better than Starbuck’s red velvet loaf cake.
How to make a Starbucks red velvet loaf recipe?
As always, let us understand the overview before we deep dive into step-by-step recipe.
| Sr. No. | Steps |
| 1. | Cream butter, sugar, and oil. |
| 2. | Add eggs, vanilla and beat. |
| 3. | Alternate dry ingredients with milk. |
| 4. | Take out some batter, add cocoa powder, baking soda, buttermilk, and red food drops. |
| 5. | Mix and prepare red velvet cake batter |
| 6. | Alternate vanilla batter with red velvet batter. |
| 7. | Bake and garnish with cream cheese glaze. |
Starbucks red velvet loaf ingredients
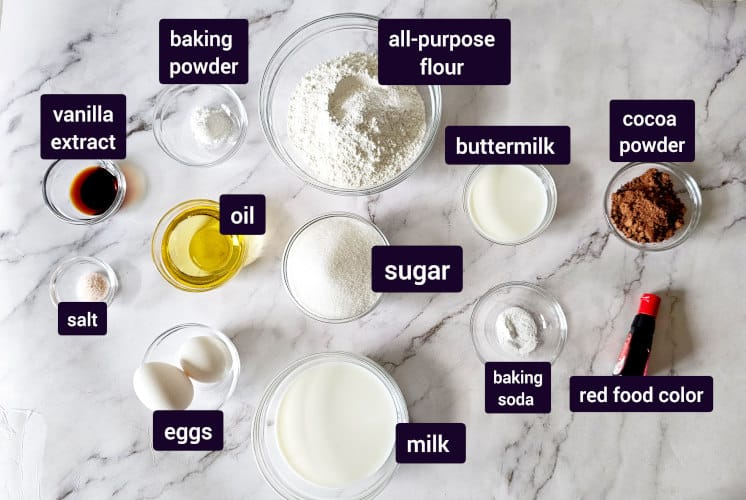
This is just a lit. For exact measurement, please see the recipe card at the bottom of this post.
Dry ingredients
- All-purpose flour – This gives structure to the cake. Use your favorite brand of all-purpose flour, no specific brand.
- Baking powder – This works as a leavening agent and helps the cake to rise.
- Salt – Just a pinch but it is needed. DO NOT SKIP unless you are using salted butter.
- Cocoa powder – Red velvet is nothing but a cake with mild chocolate flavor. So, use just a little bit.
- Baking soda – Another leavening agent, reacts with buttermilk and helps to create beautiful crumb.
Wet ingredients
- Unsalted butter – I always use unsalted butter because I can control the amount of salt that is added to the recipe but if you just have salted butter, it is ok to use.
- Oil – This gives us a moist cake. Oil makes it moist and butter makes it flavorful. So, this combination works like magic. I have tried making it only by using butter and only oil and I feel this combination works best. Use canola oil or any other flavorless oil.
- Sugar – This will sweeten the red velvet loaf of course. Use regular caster sugar or granulated sugar, whatever is available in the pantry. I do not recommend replacing it with brown sugar as it’s taste and appearance will change.
- Eggs – This acts as a binding agent and keeps all the ingredients together. Use free large eggs. Along with that, it also helps the cake to rise, resulting in a light and airy cake.
- Vanilla extract – Use pure vanilla extract or vanilla imitation depending on what is there in your pantry. Both work fine. I do not recommend using vanilla bean paste or vanilla beans as they are costly and won’t make much of a difference.
- Milk – Use 3.25% regular milk for a rich dairy flavor. You can use 2% milk but it will alter the taste because it is like adding a combination of milk and water. It will reduce the dairy flavor but it is ok to use if you only have that one at home. No need to make a special trip to the grocery store.
- Buttermilk – Use store-bought buttermilk or homemade buttermilk. This works with baking soda and helps our cake rise, resulting in tender, moist crumbs.
- Red food drops – Use either regular food drops or gel food drops. Gel ones are more concentrated so reduce the quantity if you use those. Add just a drop or two, mix, check the color, and add more if required.
Any substitute?
Sugar – Replace sugar with the same quantity of sugar-free alternatives, such as monk fruit sweetener.
All-purpose flour – Use gluten-free flour as a replacement for regular flour in the same quantity.
Tools needed
- Mixing bowl – to make cake batter.
- Measuring spoons and cups – to measure wet ingredients.
- Weighing scale – to measure dry ingredients.
- Hand beater – to make red velvet loaf cake batter.
- Rubber spatula – to scrape the sides.
- Loaf pan – To bake the red velvet loaf cake.
- Parchment paper – to line up the loaf pan.
Starbucks red velvet loaf (step-by-step) recipe
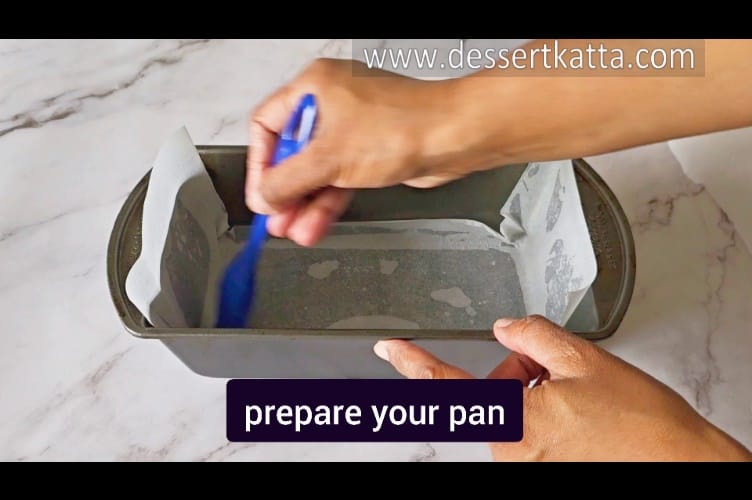
- Preheat the oven to 350°F (180°C) and prepare your 9×5 inch loaf pan. Cover it with parchment paper or butter and flour method just as I used while preparing my vanilla cake recipe.
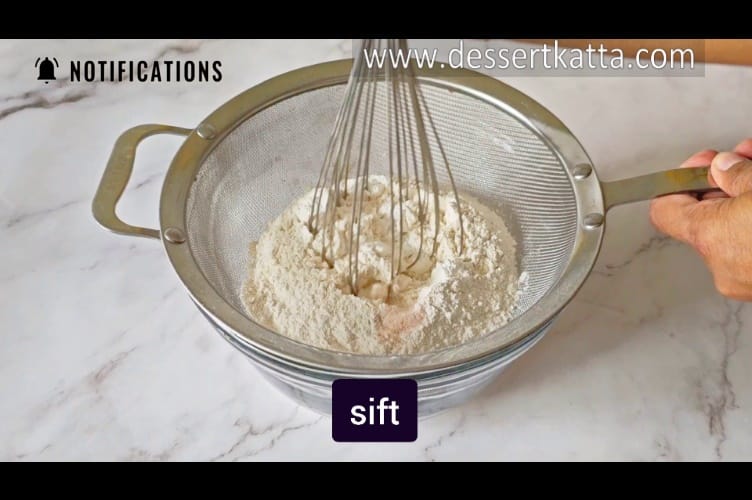
- In a large bowl, sift all dry ingredients (all-purpose flour, baking powder, salt). Keep it aside.

- Combine unsalted butter and sugar in another bowl and beat it for a few minutes.
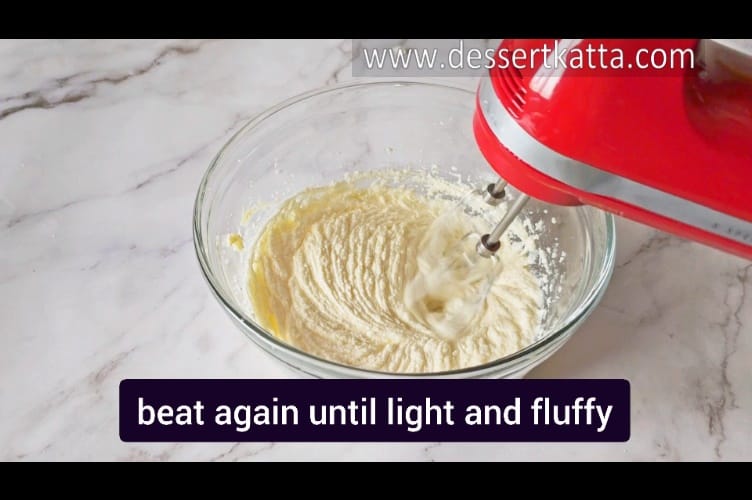
- Now add oil and beat using a hand mixer on medium to high speed until light and fluffy. This will take approximately 2 minutes. Scrape down the sides with a rubber spatula as required. Use a paddle attachment If using a stand mixer.
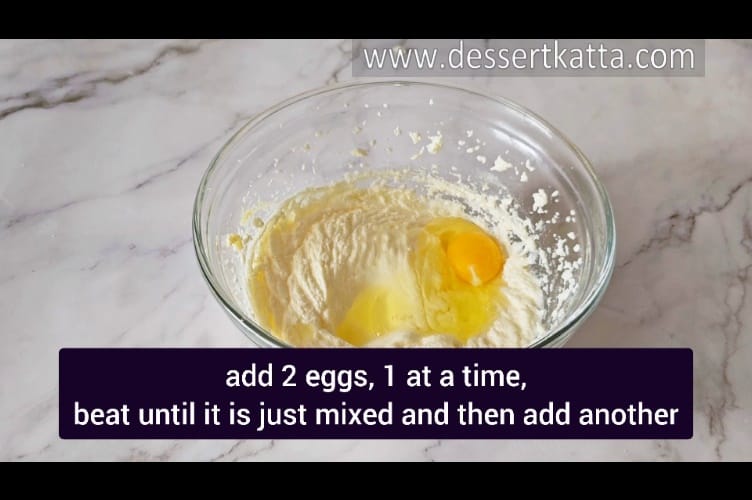
- Add eggs, one at a time. Using a hand beater mix eggs in batter until it is just combined.
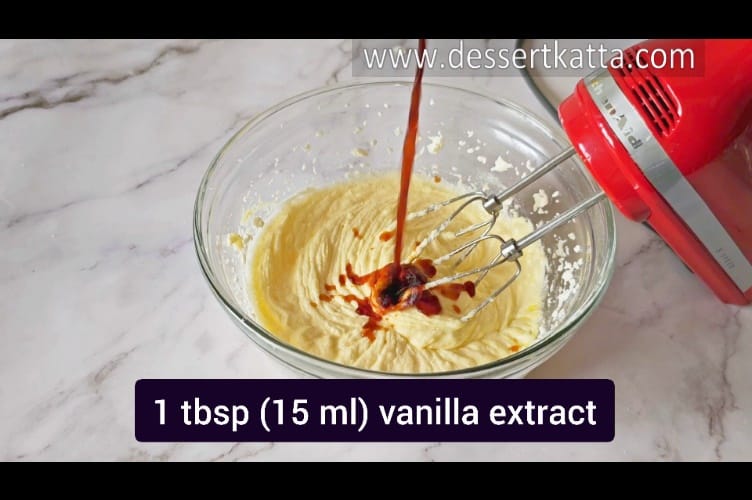
- Now add vanilla extract and beat for a few seconds or until it is just combined. Do not forget to scrape the bowl as needed.

- Add sifted dry ingredients in to the batter. beat it on low speed and mix until you see last streak of flour. DO NOT OVERMIX.

- Alternate the dry ingredients with milk. Beat again until it is just mixed.
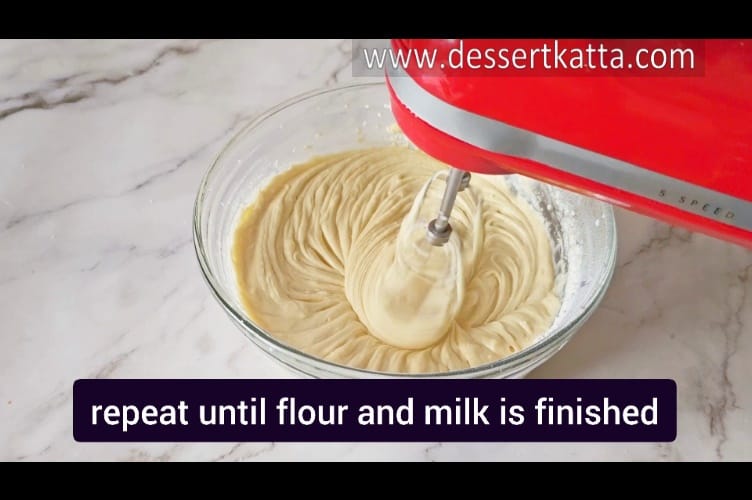
- Repeat step 8 until all of the dry ingredients and milk are finished.

- Scrape the bowl and beat again. Our vanilla cake batter is ready now.
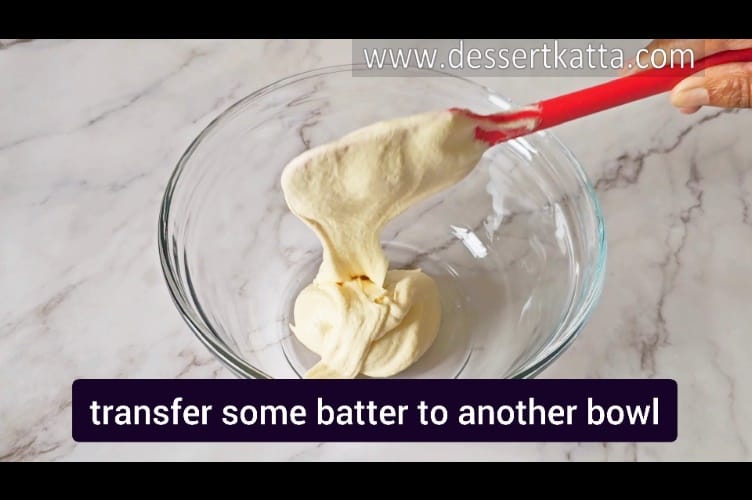
- Remove 2 to 2.5 cups of batter in another bowl to create the red velvet cake batter.
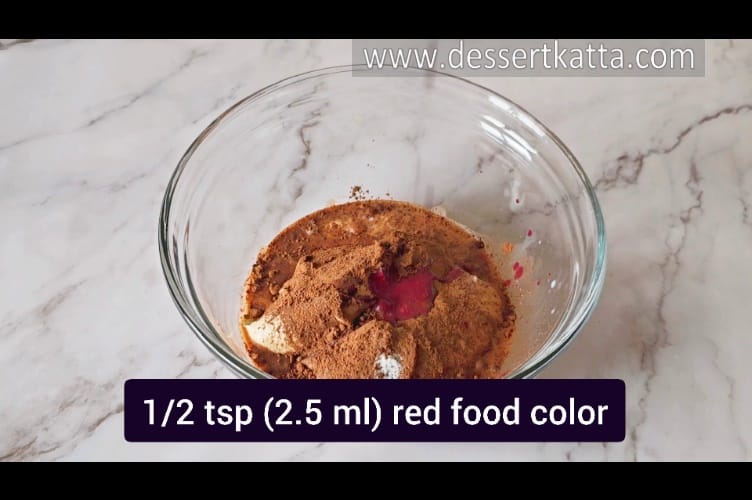
- Sift cocoa powder, buttermilk, baking soda, and red food color drops into this cake batter. Beat until it is just combined.

- The red velvet cake batter is ready. Now let’s create a swirl effect of the vanilla and red velvet cake batter.
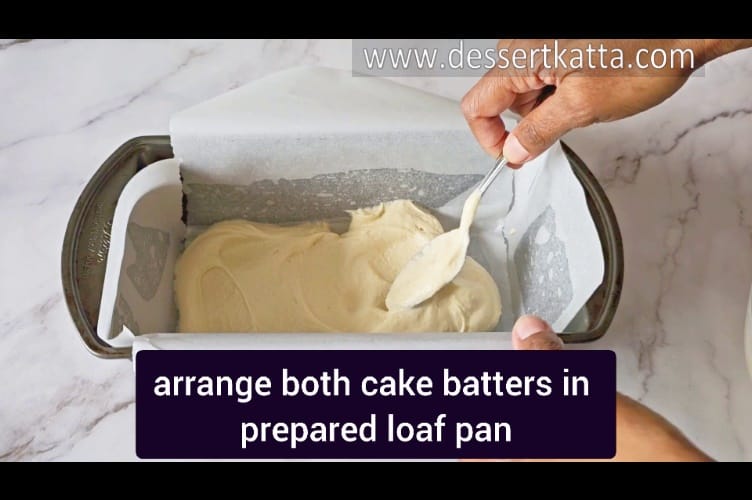
- Pour vanilla cake batter at bottom.
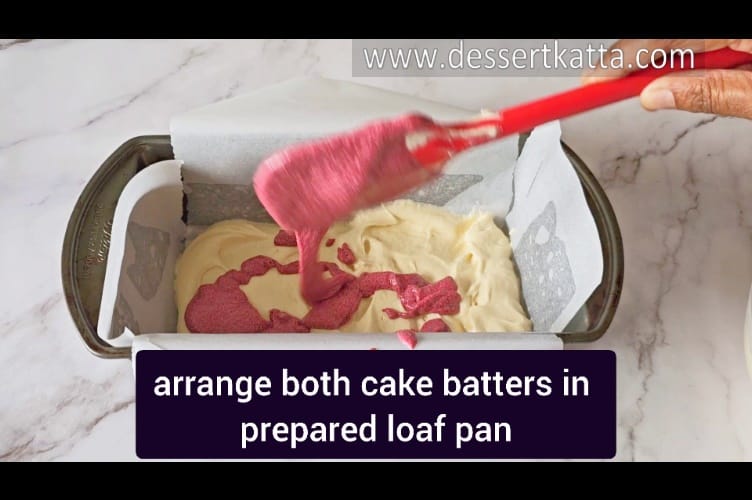
- Now add a scoop of red velvet cake batter and alternate it with a scoop of vanilla cake batter followed by red velvet cake batter and then vanilla cake batter and so on until all of the cake batter is finished. Please refer the picture as shown here.

- Using a toothpick, make horizontal zig-zags from one side of the pan to the other and then make vertical zig-zags from the top to the bottom.

- Bake in preheated oven at 350 F (180 C) for 55-60 minutes.

- Toothpick test: Insert a toothpick in the center of the cake, If it cleans out clean then it is ready. Take it out of the oven immediately. If a toothpick has moist batter then bake the loaf cake for another couple of minutes.
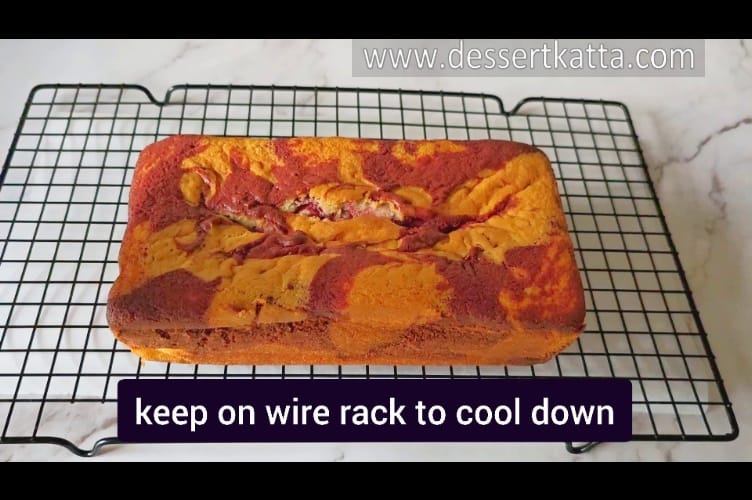
- Let is cool down for half an hour or 45 minutes. Remove it from pan and keep it on wire rack to cool down completely.
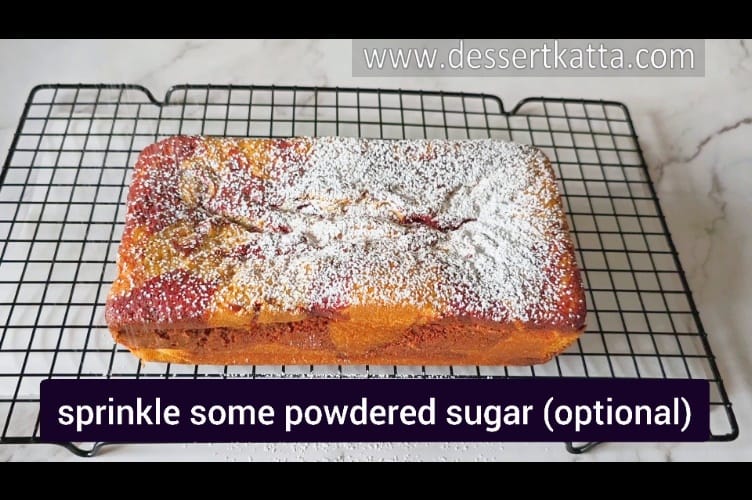
- Dust some powdered sugar on top. ( I am using powdered sugar here to increase the shelf life as I am making it for a vacation this time :).)

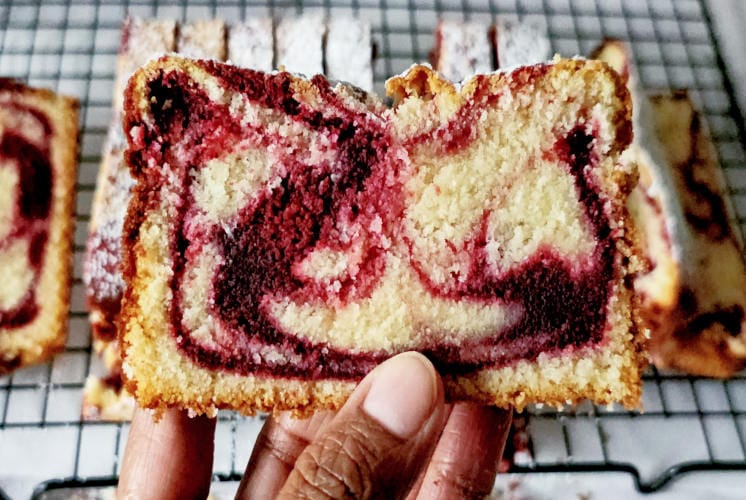
- Cut into slices with a serrated knife.
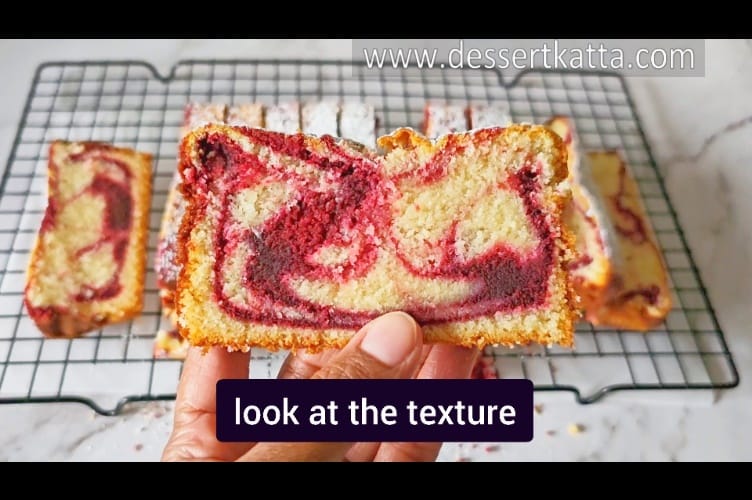
- Look at the texture and marble effect from inside. Enjoy!
Prepare cream cheese glaze (optional)
In a medium bowl, combine unsalted butter and softened cream cheese. Using a hand beater, beat it for a couple of minutes until it is light and fluffy.
Now add confectioner sugar and beat again. It will look thick but don’t worry, check the next step :).
Warm the frosting over a pot of simmering water until it reaches the pouring consistency.
Pour the glaze over the top of the cooled cake and allow it to set. It will harden as it sets.
Watch me making (video)
Storing and freezing instructions for Starbucks red velvet loaf recipe
Just like any other cake, store this Starbucks red velvet loaf cake at room temperature, in the refrigerator, or in the freezer.
Storing instructions
Plain loaf at room temperature (up to 4 days)
Whether you want to store the whole loaf or any leftovers, allow it to cool completely. Once cooled, store in an airtight container. As this is just plain loaf, it is ok to keep at room temperature for up to 4 days.
Loaf with glaze at room temperature ( up to a couple of hours)
I do not recommend storing the glazed red velvet loaf for not more than a couple of hours as it contains perishable cream cheese. In case of any leftovers, cut the loaf in individual slices and place them in an airtight container with a layer of parchment paper between them so that it does not stick to each other.
Plain loaf in the refrigerator ( up to 1 week)
Cover the loaf tightly with plastic wrap and place it in an airtight container before refrigerating. This will keep the cake fresh and save it from the fridge odors.
Loaf with glaze in the refrigerator (up to 4 days)
Once the cream cheese glaze is hardened, cover it with plastic wrap just as you would do for a plain loaf, and then refrigerate after placing it in an airtight container.
Freezing instructions
Freezing (for up to 2 months)
To enjoy the cake longer, freezing it is the best solution. You can freeze the plastic wrap-covered cake directly or cover it with an extra layer of aluminum foil and then freeze it. Use an airtight container or freezer-safe Ziplock, both work fine. And, do not forget to mention the date on it so that you know by when you have to finish it.
Thawing instructions
Loaf cake or a slice of layered cake or any cake for that matter, tastes great when it is at room temperature. So that, you can enjoy the moist, tender, and melt-in-mouth cake piece. So, make sure it is at room temperature before serving. For that, thaw the cake or individual slices in the refrigerator overnight. If you are in a hurry, place the cake on the kitchen counter for a few hours and you are all set.
Variations
I have frosted it with cream cheese glaze as red velvet cake with cream cheese is a classic combination. Feel free to experiment with your choice of frosting or glaze. Here are some recommendations
- Ermine frosting – This also pairs nicely with red velvet cake.
- Vanilla icing – This is very simple to make. Refer to my orange glaze or lemon glaze recipe. Replace lemon or orange juice with vanilla extract. It’s that simple.
- Chocolate glaze – Simply add a little cocoa powder in vanilla icing, mix and it is ready.
Secret tips to make Starbucks red velvet loaf recipe
- Measure ingredients – I always recommend measuring the ingredients rather than just eyeballing them as baking is a science and if you want your cake to turn out the best and the same every time, there is no alternative to measure the ingredients correctly. To be very precise, use a weighing scale. This is the weighing scale I have.
- Sift ingredients – To evenly distribute leavening agents, always combine with flour and sift them all at least once.
- Don’t overmix – Overmixing will form the gluten, resulting in a hard cake.
- Don’t overbake – Overbaking any cake will result in a dry cake and this red velvet loaf cake is no exception. Always perform a toothpick test as I instructed in a step-by-step recipe. Also, overall baking time may be different for your oven, so keep an eye after 35 minutes and check if it is done. Once you know it, you know when to take it out when you are making it next time.
- Cool the cake – Before pouring the glaze, make sure it is completely cooled down otherwise it will melt, creating a soggy top and mushy cake.
FAQ’s
What size pan do I use? I have used a 9 X 5 inch loaf cake pan and baking time is given according to this pan. Feel free to use any other pan that you have it handy but do not forget to adjust the baking time accordingly.
Can I make a loaf cake with cake mix? You can make it using a cake mix but it will not taste as good as your homemade version. And if you check, it doesn’t contain fancy ingredients so I highly recommend making it home and thank me later because you are going to get a lot of applaud and your friends are going to like it for sure.
If you have any further questions, please feel free to drop a comment below and I will be happy to answer them :).
Want to try some other loaf cake recipes?
If you like this Starbucks red velvet loaf cake, you will surely like my other loaf cake recipes.
Did you make it?
Now it’s your turn. Did you make this Starbucks red velvet loaf cake recipe as instructed here or did you add in twist? Please let me know. Drop your comments below. I would love to hear from you and your feedback matters the most.
I can’t wait to see your creations. Do not forget to tag me (@dessertkatta) or use the hashtag #dessertkatta or #dessertkattarecipes if you post the pic on Instagram.
Recipe card

Starbucks red velvet loaf cake recipe (easy, marble effect)
Description
Are you craving a Starbucks red velvet loaf? You don't need to head to Starbucks because you can create this soft cake at home. Most importantly, you do not need any special ingredients or tools to make this. Excited? Let's get started.
Ingredients
Vanilla Cake Ingredients
Red Velvet Cake Ingredients
Recipe
- Preheat the oven to 350°F (180°C) and prepare your 9×5 inch loaf pan. Cover it with parchment paper or butter and flour method just as I used while preparing my vanilla cake recipe.

- In a large bowl, sift all dry ingredients (all-purpose flour, baking powder, salt). Keep it aside.
- Combine unsalted butter and sugar in another bowl and beat it for a few minutes.
- Now add oil and beat using a hand mixer on medium to high speed until light and fluffy. This will take approximately 2 minutes. Scrape down the sides with a rubber spatula as required. Use a paddle attachment If using a stand mixer.
- Add eggs, one at a time. Using a hand beater mix eggs in batter until it is just combined.
- Now add vanilla extract and beat for a few seconds or until it is just combined. Do not forget to scrape the bowl as needed.
- Add sifted dry ingredients in to the batter. beat it on low speed and mix until you see last streak of flour. DO NOT OVERMIX.
- Alternate the dry ingredients with milk. Beat again until it is just mixed.
- Repeat step 8 until all of the dry ingredients and milk are finished.
- Scrape the bowl and beat again. Our vanilla cake batter is ready now.
- Remove 2 to 2.5 cups of batter in another bowl to create the red velvet cake batter.
- Sift cocoa powder, buttermilk, baking soda, and red food color drops into this cake batter. Beat until it is just combined.
- The red velvet cake batter is ready. Now let's create a swirl effect of the vanilla and red velvet cake batter.
- Pour vanilla cake batter at bottom.
- Now add a scoop of red velvet cake batter and alternate it with a scoop of vanilla cake batter followed by red velvet cake batter and then vanilla cake batter and so on until all of the cake batter is finished. Please refer the picture as shown here.
- Using a toothpick, make horizontal zig-zags from one side of the pan to the other and then make vertical zig-zags from the top to the bottom.
- Bake in preheated oven at 350 F (180 C) for 55-60 minutes.
- Toothpick test: Insert a toothpick in the center of the cake, If it cleans out clean then it is ready. Take it out of the oven immediately. If a toothpick has moist batter then bake the loaf cake for another couple of minutes.
- Let is cool down for half an hour or 45 minutes. Remove it from pan and keep it on wire rack to cool down completely.
- Dust some powdered sugar on top. ( I am using powdered sugar here to increase the shelf life as I am making it for a vacation this time :).)
- Cut into slices with a serrated knife.
- Look at the texture and marble effect from inside. Enjoy!

Wow! Cake looks fluffy
Thank you so much ♥️ I am glad you liked it 😊.