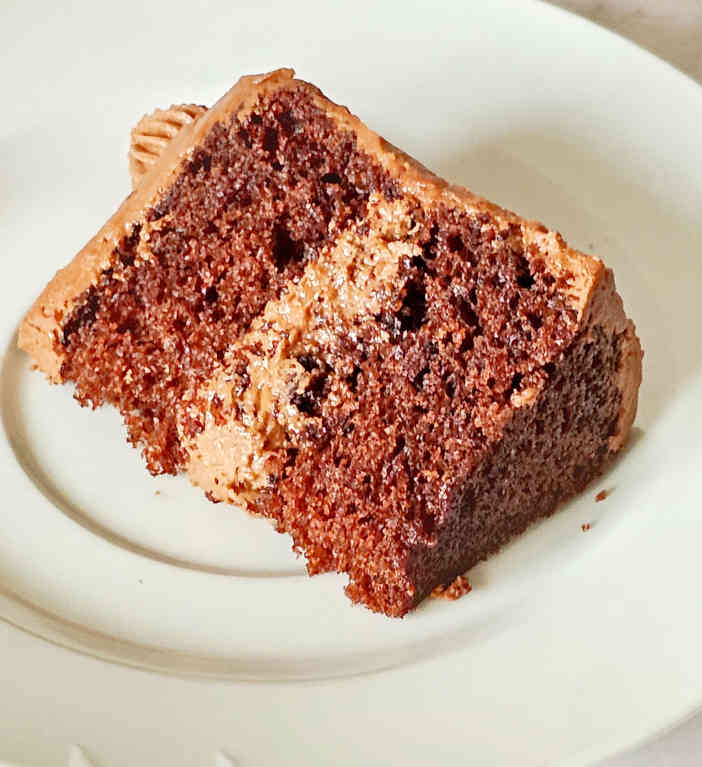
Try this easy-to-follow, moist, delicious mini mocha cake recipe with coffee-flavored mocha buttercream.
This recipe appeals to me since it is small-batch, simple to prepare, and filled with a deep, chocolatey flavor with a dash of espresso that elevates everything to a new level.
No stand mixer, no complicated steps—just simple ingredients and a dreamy little cake ready in less than an hour.
Let's get to it!

As always, let us understand the overview before diving into the step-by-step recipe.
| Sr. No. | Steps |
| 1. | Make chocolate cake. |
| 2. | Prepare mocha buttercream frosting. |
| 3. | Assemble the cake with mocha buttercream. |
| 4. | Cut, serve. |
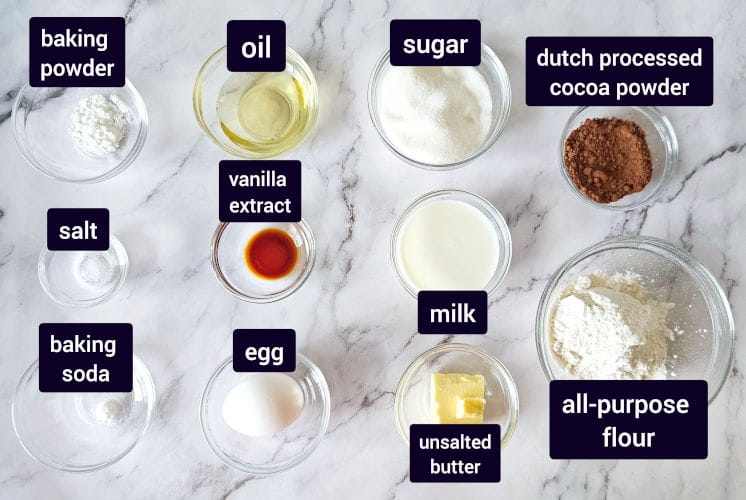
All-purpose flour - Use plain flour from whichever brand you like. This is the foundation of our recipe, providing structure to the cake. Do not replace it with any other flour. (Self-rising flour contains leavening chemicals, but cake flour contains less gluten, making it extremely light and unable to hold up on its own.)
Dutch-processed cocoa powder - This is the standout ingredient in our chocolate base. This delivers a deep, intense chocolate flavor that normal cocoa powder cannot provide.
Baking powder - Acts as a leavening agent, allowing the cake to rise.
Baking soda - another rising agent. reacts with cocoa powder to make the cake rise.
Salt - We only need a pinch to balance the sweetness. Also, it enhances the flavors. It should not be skipped unless you are using salted butter.
Unsalted butter - Any kind of unsalted butter will work. Make sure it's room temperature so it can mix well with the other ingredients. If you have salted butter in the pantry, you can use it, but leave out the salt.
Sugar - This, of course, is what provides the sweetness. Use either standard caster sugar or granulated sugar; both work well.
Oil - Combine any flavorless oil with the butter to make a soft and tender chocolate cake. Please don't replace it with butter.
Vanilla extract - Only a half teaspoon, but it enhances the chocolate flavor and adds a wonderful sweet perfume to the cake.
Egg - Use a large free-range egg. This functions as a binder and provides moisture to the cake. Make sure it's room temperature. If you forget to take it out of the fridge, simply place it in a glass of very hot water for 5 minutes and you're ready to go.
Milk - This provides a rich dairy flavor. Use any brand of milk that contains 3.25%. It is fine to use 2% or skim milk, although the flavor will be somewhat altered.

Unsalted butter - This is the main ingredient of any buttercream recipe. Make sure it is at room temperature so that it gets mixed with the rest of the ingredients easily.
Icing sugar - Also referred to as icing sugar or powdered sugar, both are the same. Use homemade icing sugar or store-bought.
Dutch-processed cocoa powder - This adds rich, chocolatey flavor and also reduces the sweetness of the buttercream. It is ok to use regular cocoa powder if that is what you have in the pantry.
Espresso powder - This is what gives our buttercream its signature mocha taste. It adds the coffee flavor and also helps to balance the sweetness.
Heavy cream - This is added to adjust the buttercream consistency.
Vanilla extract - This not only brings out the chocolate and coffee flavor, but also adds its subtle vanilla flavor.
Salt - Do not skip it. I add salt to almost all of my dessert recipes. A little bit of salt is needed to take your dessert to the next level.
Heavy cream - Use full-fat, low-fat, or 1% milk instead of heavy cream.
This mini mocha cake tastes best when served warm. Below are some of my suggestions for pairing to make it even more delicious.

Just like my mini chocolate cake or mini red velvet cake, this cake can be stored at room temperature, in the refrigerator, or in the freezer.
Store this mini cake naked (i.e., without frosting) or with frosting.
Store naked cake – First, cool the cake completely and then cover with plastic wrap. Then, store it in an airtight container at room temperature for 2 to 3 days or in the refrigerator for up to 6 – 8 days.
Store frosted cake – I would recommend storing individual slices than the entire cake. It is just easy to store that way. Here are the steps.
Whether you store naked or with frosting, make sure to cover it using a plastic wrap to protect the cake from outside odors.
You can freeze naked or frosted cakes in the same way you would store them.
Freeze a naked or frosted cake - place it in an airtight container, freezer-safe container, or heavy-duty Ziplock bag. Cover it with aluminum foil to provide extra protection. Don't forget to include dates so you know when you need to finish it.
To avoid thawing the entire cake, I recommend storing or freezing individual slices rather than the entire cake.
When you want to enjoy it, either thaw it in the refrigerator overnight or on the kitchen counter for a couple of hours, and you are good to go.
In short,
Storing and freezing for naked cake
| Sr. No. | Storage Type | Duration (days weeks/ months) |
| 1. | Room temperature | 2 to 3 days |
| 2. | Refrigerator | 6 to 8 days |
| 3. | Freezer | 2 months |
Storing and freezing frosted cake
And
| Sr. No. | Storage Type | Duration (days weeks/ months) |
| 1. | Room temperature | 2 to 3 days |
| 2. | Refrigerator | 5 to 8 days |
| 3. | Freezer | 2 months |

If you have any further questions, please feel free to drop a comment below, and I will be happy to answer them.
I would love to know when you plan to make this amazing mini mocha cake! Please let me know how this turns out for you.
Do you forget to tag me @dessertkatta or #dessertkatta, #dessertkattarecipes if you post it on Instagram.
Feel free to share your experiences, tips, and questions. This is a place where we can learn from one another and be motivated to bake something amazing! I cannot wait to hear from you!
Whether you're baking for a relaxing night in, a last-minute treat, or simply desiring something sweet with your afternoon coffee, this small cake will not disappoint. Trust me, after you've tried it, you'll want to make it again!
Thank you for visiting DessertKatta. Please follow Dessert Katta for more dessert recipes by Sayali Bhave.


